Experian Address Validation provides multiple layout configuration options.You can use a public layout that is available to all users, or create a custom layout tailored to your specific requirements.
To create custom layouts, you can directly use our Layout builder, or ask for assistance by contacting us.
Using the Layout builder
To access the Layout builder, follow one of the suggested access paths. Then, choose how to create your custom layout - start from scratch or duplicate an existing layout.
The New layout option is recommended when you need a completely new structure and you are designing a layout for a new use case.
To improve usability, we support two Layout builder versions. When creating a new custom layout, you can choose the builder that best suits your needs.
Use Layout builder 1.0 when you need full flexibility for complex address layouts or multi‑country configurations.
Define basics
Enter a Layout name.
Add any additional Notes.
Select the Country using the dropdown menu or by entering a search term to filter the country list.
Select the Dataset using the dropdown menu. You may select more than one dataset.
Click the Apply button to review your selections.
Repeat steps 1.3 to 1.5 for additional countries and datasets.
Click Next to proceed.
Configure address elements
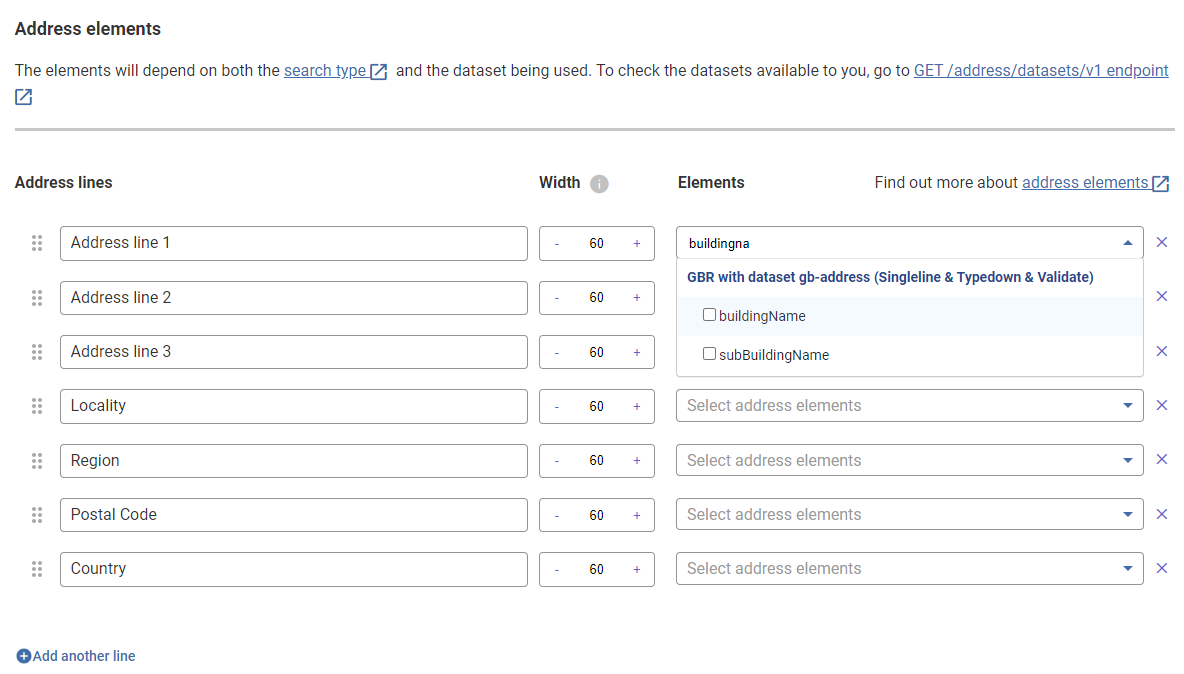
Configure the width of the address lines (default width is 60).
To remove address lines, use the cross icon.
Click Add another line to add additional address lines.
You can drag and drop the address lines to rearrange their sequence using the six-dots icon .
To add address elements, click the dropdown button and select the required elements.
Click Next to proceed.
Options object
If required, select the applicable address elements to abbreviate in Abbreviate Item.
If required, select the applicable address elements to capitalize in Capitalize Item.
Address elements are configured with a default element separator (","). You may also click the Configure by address elements button to enter a different element separator for each address element if needed.
Click Next to proceed.
Review
You can now review your custom layout including the defined basics, address elements, and options objects that you configured.
If needed, click the Edit details button in the corresponding sections to adjust your configuration details.
When you are happy with your layout, click Create layout to finalize your changes
Layout created
You will be notified that your layout was created successfully.
You can now view your layout in the Layout management dashboard by clicking View all layouts, or you can view your layout details again by using the View details button.
Use Layout builder 1.1 for a setup with standardized address element categories and clear structure.
Define basics
Enter a Layout name.
Add any additional Notes.
Select the Country using the dropdown menu or by entering a search term to filter the country list.
Select the Dataset using the dropdown menu. You may select more than one dataset.
Click the Apply button to review your selections.
Repeat steps 1.3 to 1.5 for additional countries and datasets.
Click Next to proceed.
Configure address elements
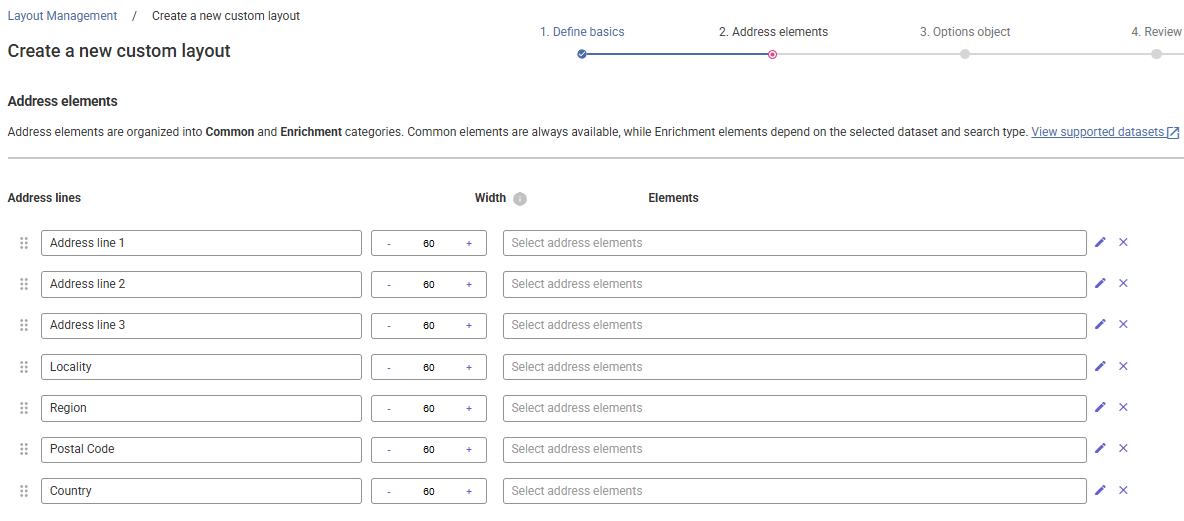
Configure the width of the address lines (default width is 60).
To remove address lines, use the cross icon.
Click Add another line to add additional address lines.
You can drag and drop the address lines to rearrange their sequence using the six-dots icon .
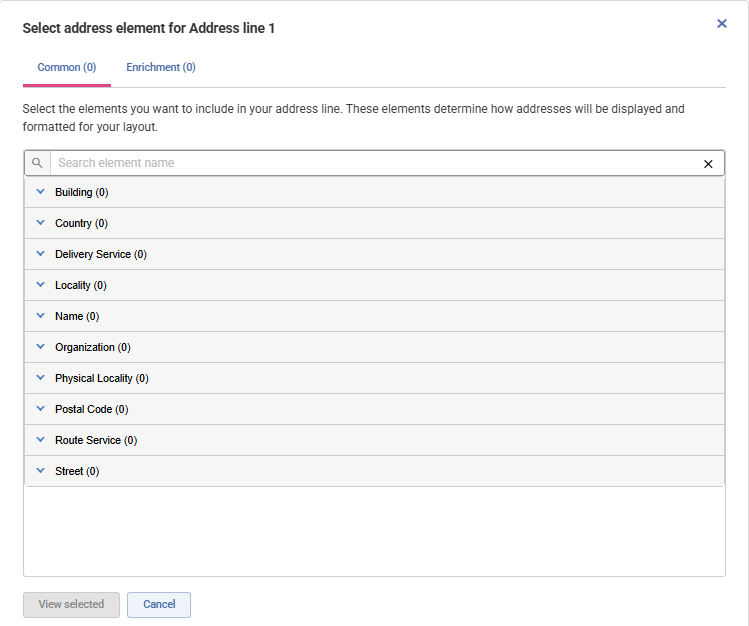
To add address elements, click the Pencil icon for the respective address line.
In Layout builder 1.1, address elements are organized into Common and Enrichment categories.
Common – standardized address elements shared across datasets and search types.
Enrichment – dataset‑specific elements (available where supported).
Click Next to proceed.
Options object
If required, select the applicable address elements to abbreviate in Abbreviate Item.
If required, select the applicable address elements to capitalize in Capitalize Item.
Address elements are configured with a default element separator (","). You may also click the Configure by address elements button to enter a different element separator for each address element if needed.
Click Next to proceed.
Review
You can now review your custom layout including the defined basics, address elements, and options objects that you configured.
If needed, click the Edit details button in the corresponding sections to adjust your configuration details.
When you are happy with your layout, click Create layout to finalize your changes
Layout created
You will be notified that your layout was created successfully.
You can now view your layout in the Layout management dashboard by clicking View all layouts, or you can view your layout details again by using the View details button.
The Duplicate existing custom layout is recommended when you want to modify an existing layout to quickly create a new use case.
When you choose this option, you need to select the custom layout you want to duplicate from the dropdown menu.
Alternatively, you can also access it directly from the Layout management page by selecting Duplicate icon in the Action column next to the layout you want to reuse.
The Create a new custom layout page opens with pre-populated configuration from the selected layout.
Enter a Layout name. It is a mandatory field.
Modify the configurations. You can change the country and dataset options, the address elements, and their formatting.
Review your new custom layout configuration including the defined basics, address elements, and options objects that you configured.
If needed, click the Edit details button in the corresponding sections to adjust your configuration details. When you complete the layout, click Create layout to save the changes.
You can then view your layout in the Layout management dashboard by clicking View all layouts, or you can view your layout details again by using the View details button.
Version compatibility
Once created, a layout can only be edited or duplicated within the same Layout builder version.