Once the app is installed, you can access the Settings page by clicking Experian Data Validation in the Apps section of the admin sidebar. To activate Experian Data Validation in your checkout, first enter your authentication token and then adjust the configuration options as needed.
The following configuration options are available:
You will need to provide your Experian API authentication token. If you don’t already have a token, please visit the Self Service Portal to obtain one or contact one of our regional sales teams.
The token must be associated with the appropriate licensed products that you intend to use - Address, Email, and/or Phone Validation. It will be validated on entry. If validation succeeds, the token is marked with an Active badge. If the token is invalid, it will be marked with a Not licensed badge. In case there are network issues, it will be assigned an Unknown badge.
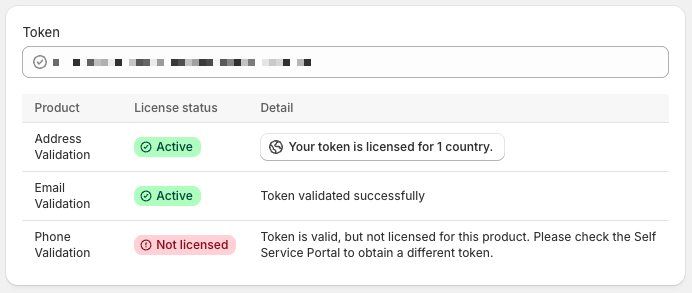
If the token is valid and the app detects a change to your licensed address datasets, you will be prompted to review your datasets configuration.
If you encounter any errors when setting your token, please refer to our troubleshooting guide.
Our Experian Address Validation API has an optional country specific datasets parameter, which allows you to specify a collection of datasets you want to search against. This setting only needs configuring if you don't wish to use the default address dataset and you are correctly licensed for an additional dataset.
The API documentation details the possible values for each country and search type, which in the case of our Shopify app is Autocomplete. Currently, the following countries have options for additional datasets beyond the default address dataset:
Only licensed datasets displayed
When you enter a valid authentication token, a check will be carried out to see if any datasets are licensed. A warning message may be shown if any changes are detected, giving you a chance to check your current settings before they are reset.
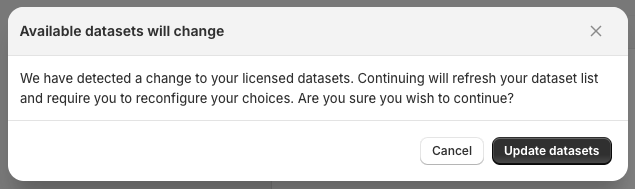
License changes
The maximum number of address picklist suggestions displayed can be set to between 3 and 5. Note that 5 is the maximum imposed by the Shopify API.
If the checkout form options have been configured to include the Company name field, you can use this setting to populate the field if the data is available.
Limitations
Address formats from postal authorities around the world can differ considerably and Experian Address Validation will provide the best possible response and format for any given country.
By default, to ensure consistency, our integration will populate only the first Address field. However, if the checkout form options have been configured to include the Address line 2 (apartment, unit, etc.) field, you can use this setting to control how the address is distributed across the two lines, based on the three address lines returned by the Experian API.
| Option | Address line population |
|---|---|
| Use address line 1 only | Shopify AL1 = Experian AL1, Experian AL2, Experian AL3 Shopify AL2 = NOT USED |
| Use both address lines, weighted towards line 1 | Shopify AL1 = Experian AL1, Experian AL2 Shopify AL2 = Experian AL3 |
| Use both address lines, weighted towards line 2 | Shopify AL1 = Experian AL1 Shopify AL2 = Experian AL2, Experian AL3 |
This optional feature enables an additional block, which can be utilized on either the Checkout (Shopify Plus plan only) or Thank you page to provide advanced address verification.
On the Checkout page, it is designed to be used in tandem with our address autocompletion extension and appears beneath the delivery address. If edits are made to an address suggestion, for example to add a missing apartment number, the block will appear and offer the user the choice of validating the changes to ensure the address is deliverable.
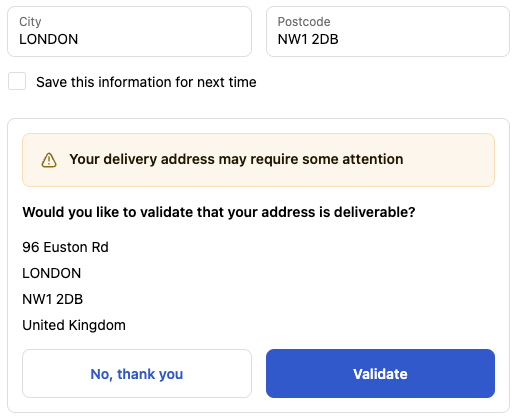
On the Thank you page, the block verifies the address and then appears automatically with choices for the user.
In addition to enabling the feature here within the Settings page of our app, the block must be added in Shopify's checkout and accounts editor, on either the Checkout or Thank you page.
Full details on this feature, its limitations, how to configure it and the additional costs can be found on the advanced address verification page.
This optional feature enables Delivery Point Validation (DPV) indicators to be utilized when verifying USA addresses. DPV identifies whether a ZIP + 4 coded address is currently represented in the USPS delivery file as a known address record.
If enabled, the DPV value will be used in the following scenarios:
If the user selects a suggested autocomplete address with a DPV value indicating a deliverability issue, the address verification block will be triggered on the Checkout page.
The user accepts an address suggested by the address verification block on either the Checkout or Thank you page, but the address still has a DPV value indicating a deliverability issue.
Full details on this feature can be found on the advanced address verification page.
With this feature enabled, when an address suggestion is selected during checkout, the coordinates of a delivery address are sent to the Shopify Carrier Service API when calculating shipping rates.
Note that this option only becomes available if the provided authentication token is licensed for the Premium Location Insight Lite dataset.
If available, the latitude and longitude of the entry point to the specified address (geocodes_access element) will be used. Otherwise, the latitude and longitude of the address (geocodes element) will be used.
Full details on this feature, how to configure it and the additional costs can be found on the email and phone validation page, but below are the basic settings.
There are two options for handling a successfully validated email address:
| Option | Description |
|---|---|
| Show success message (default) | Display a confirmation message |
| Hide | Do not display a confirmation message |
If the email appears risky or unreachable, a message can be displayed indicating the email is likely invalid.
There are three options for handling this scenario:
| Option | Description |
|---|---|
| Ignore | Do not display any message and allow the user to continue |
| Warn (default) | Display a warning box, but give the user the option of continuing anyway |
| Block | Display a warning box, as well as an error message below the contact field, and block the checkout until they click Continue anyway |
If the email address could not be conclusively verified, a message can be displayed indicating this. This does not necessarily mean the address is invalid. It may be temporarily unavailable for verification or belong to a domain that does not allow mailbox validation.
There are three options for handling an email address that could not be verified:
| Option | Description |
|---|---|
| Ignore | Do not display any message and allow the user to continue |
| Warn (default) | Display a warning box, but give the user the option of continuing anyway |
| Block | Display a warning box, as well as an error message below the contact field, and block the checkout until they click Continue anyway |
Full details on this feature, how to configure it and the additional costs can be found on the email and phone validation page, but below are the basic settings.
There are two options for handling a successfully validated phone number:
| Option | Description |
|---|---|
| Show success message (default) | Display a confirmation message |
| Hide | Do not display a confirmation message |
If the phone number appears to be incorrect or unable to receive calls or text messages, a message can be displayed indicating this. This may be because the number is no longer active, has an invalid format, or is assigned to a service that cannot receive voice or SMS communications.
There are three options for handling a phone number that is likely invalid:
| Option | Description |
|---|---|
| Ignore | Do not display any message and allow the user to continue |
| Warn (default) | Display a warning box, but give the user the option of continuing anyway |
| Block | Display a warning box, as well as an error message below the contact field, and block the checkout until they click Continue anyway |
If the phone number could not be conclusively verified, a message can be displayed indicating this. This does not necessarily mean the number is invalid. It may simply be temporarily unavailable or the live status could not be determined.
There are three options for handling an phone number that could not be verified:
| Option | Description |
|---|---|
| Ignore | Do not display any message and allow the user to continue |
| Warn (default) | Display a warning box, but give the user the option of continuing anyway |
| Block | Display a warning box, as well as an error message below the contact field, and block the checkout until they click Continue anyway |
Note that these optional premium services each cost an additional 1 credit per request if results are returned.
Enable this setting to ensure the confidence level for the phone number returned is as accurate as possible by including the live status for mobile numbers in the United States and/or landline numbers in the United Kingdom.
Enable this setting to return the ported status and last known ported date for a phone number within a select number of countries.
Choose the log level used for browser console events. Higher verbosity levels provide more information: